How to Automatically Delete Files in Windows
如何在 Windows 中自动删除文件
Create a batch file and then schedule it to run
创建一个批处理文件,然后安排它运行
Earlier I wrote about a program called DropIt that automatically moves or copies files for you when new files appear inside a folder. This can be useful, for example, if you have limited space on a local hard drive and want to move all your downloads off to an external storage device.
之前我写过一个叫做 DropIt 的程序,当新文件出现在文件夹中时,它会自动为你移动或复制文件。例如,如果您的本地硬盘空间有限,并希望将所有下载内容移动到外部存储设备,那么这可能会很有用。
If you want to automatically delete files, there are two ways you can go about it in Windows. The first method involves downloading a freeware app called AutoDelete that lets you configure a schedule for deleting files in a particular folder. I’ve already written two detailed guides on using the program , so check those out if you prefer a freeware program to get the job done.
如果你想自动删除文件,在 Windows 中有两种方法。第一种方法包括下载一个名为 AutoDelete 的免费软件应用程序,该应用程序允许您配置删除特定文件夹中的文件的时间表。我已经写了两篇关于如何使用这个程序的详细指南 ,所以如果你更喜欢免费软件程序来完成这项工作,请查看这些指南。
The second method for deleting files is to create a batch file and then schedule that batch file to run. You can do all of that without installing any third-party software. In this article, I’ll walk you through the steps for creating a batch file and then using Task Scheduler to have the script run on a reoccurring basis.
删除文件的第二种方法是创建一个批处理文件,然后安排该批处理文件运行。你可以在不安装任何第三方软件的情况下完成所有这些操作。在本文中,我将指导您完成创建批处理文件的步骤,然后使用 Task Scheduler 在重复的基础上运行脚本。
Step 1 – Create Batch File
步骤1-创建批处理文件
If creating a batch file sounds a bit scary or too technical, don’t worry because you don’t have to know what any of that means. I’ll explain what you need to copy and paste, where and what options you can change. First, open Notepad and copy and paste the following line of text:
如果创建一个批处理文件听起来有点吓人或者太技术化,不要担心,因为你不需要知道这些意味着什么。我将解释您需要复制和粘贴哪些内容,以及您可以更改哪些选项。首先,打开记事本,复制粘贴下面的文本行:
forfiles -p "C:\Test" -s -m *.* /D -5 /C "cmd /c del @path"
The line above probably makes no sense, which is perfectly fine as I’ll explain it down below. Basically, it tells Windows to delete all files in the C:\Test folder and sub-folders that are older than 5 days. Here is what your Notepad file should look like.
上面的这条线可能没有任何意义,这是非常好的,因为我将在下面解释它。基本上,它告诉 Windows 删除 c: Test 文件夹和超过5天的子文件夹中的所有文件。下面是你的记事本文件应该是的样子。
Before we get into more details about the command, let’s save the file and give it a test run. First, create a folder on your computer called Test at the root of the C drive. Next, click File – Save and save the file as a batch file. To do that, type in a name followed by .bat and then change the Save as type dropdown to All Files.
在了解更多关于该命令的细节之前,让我们先保存该文件并对其进行测试运行。首先,在 c 驱动器的根目录下创建一个名为 Test 的文件夹。接下来,单击 File-Save 并将文件保存为批处理文件。要做到这一点,输入一个名称后面跟着。然后更改保存类型下拉到所有文件。
Note that you can save the file to whichever location on the hard drive you like, it doesn’t really matter. Now create some dummy files in the Test folder and then double click on the Delete.bat file to run it. Anything get deleted? Probably not!
请注意,您可以将文件保存到硬盘驱动器上您喜欢的任何位置,这并不重要。现在在 Test 文件夹中创建一些虚拟文件,然后双击 Delete.bat 文件运行它。有什么被删除了吗?可能不会!
The reason why nothing was deleted is because the command has /D -5, which means files that are 5 days or older. In order to delete any file regardless of when it was created, you can either change the -5 to -0 or you can remove the /D -5 part altogether. Now if you run it, all the files will be deleted.
之所以没有删除任何内容,是因为命令具有/d-5,这意味着文件已经超过5天。为了删除任何文件,不管它是什么时候创建的,您可以将 -5修改为 -0或者完全删除/d-5部分。现在,如果你运行它,所有的文件将被删除。
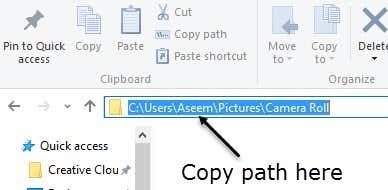
To customize the command, the first thing you can do is change the directory to something other than C:\Test. That’s as simple as copying the path from Windows Explorer for the directory you want and pasting it into the command in Notepad.
要自定义命令,首先要做的是将目录更改为 c: Test 以外的其他目录。这很简单,只需将路径从文件资源管理器文件中复制到你想要的目录,然后粘贴到记事本中的命令中。
Next is the -s parameter that you see after the directory path. This indicates that the command should look into all sub-folders also. If you do not want to delete files from subfolders, go ahead and remove the -s parameter.
接下来是您在目录路径之后看到的-s 参数。这表示命令还应该查看所有子文件夹。如果不想从子文件夹中删除文件,请继续删除-s 参数。
Next is -m followed by *.*, which means that the command should evaluate files of every kind. If you only want to delete a specific file type in a folder, like PDF files or JPG images, just change *.* to *.pdf or *.jpeg and it will only remove those files.
下一个是-m,接着是 * 。* ,这意味着命令应该评估各种文件。如果您只想删除文件夹中的某个特定文件类型,比如 PDF 文件或 JPG 图像,只需更改 * 。* to * .Pdf 或 * 。它只会删除那些文件。
The /D -X part we already talked about in terms of how old the files have to be in order to qualify for deletion. You can either keep it with a value greater than 1, set it to 0, or remove it altogether. That’s about all we need to know about the command.
我们已经讨论过的/d-x 部分涉及文件的年龄以便有资格被删除。您可以将其保持为大于1的值,也可以将其设置为0,或者将其完全删除。这就是我们需要知道的关于指挥部的一切。
There are a few things to note about running this command. Firstly, when files are deleted, they do not go to the Recycle Bin, but instead are deleted permanently, so be careful when using it. Secondly, the command only deletes files, not folders.
关于运行这个命令,需要注意一些事项。首先,当文件被删除时,它们不会进入回收站,而是被永久删除,所以使用时要小心。其次,该命令只删除文件,而不删除文件夹。
Since this is a batch file, you could also add multiples versions of this command in the same file. For example, here I am creating a batch file that will delete all DOCX files older than 180 days, all PDF files older than 60 days and all TXT files regardless of how old the files are.
由于这是一个批处理文件,您还可以在同一文件中添加该命令的多个版本。例如,这里我正在创建一个批处理文件,它将删除所有超过180天的 DOCX 文件,所有超过60天的 PDF 文件和所有 TXT 文件,不管这些文件有多老。
Step 2 – Schedule Batch File
第二步-安排批处理档案
Now that you have your batch file created and saved, let’s go ahead and schedule it to run on a reoccurring basis. To do this, we have to open up Task Scheduler.
现在您已经创建并保存了批处理文件,接下来让我们继续安排它在重复出现的基础上运行。要做到这一点,我们必须打开任务计划程序。
Luckily, I’ve already written an article on how to schedule a batch file, so open that page to get started. Scroll down to the Schedule Batch File on PC Startup section and follow along.
幸运的是,我已经写了一篇关于如何安排批处理文件的文章,所以打开那个页面开始吧。向下滚动到 PC 启动部分的计划批处理文件,然后跟随。
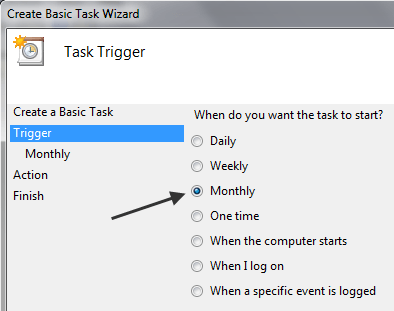
The only thing you have to change is the Trigger. You can choose from Daily, Weekly, Monthly, When the computer starts, When I log on or When a specific event is logged.
你唯一需要改变的就是触发器。您可以从“每日”、“每周”、“每月”、“计算机启动时间”、“登录时间”或“记录特定事件时间”中进行选择。
When you pick something like Weekly or Monthly and click Next, you’ll get a new screen where you can configure the exact time and days you want the script to run.
当您选择诸如周或月之类的内容,然后单击 Next,您将得到一个新的屏幕,您可以在其中配置希望脚本运行的确切时间和天数。
Hopefully, this is a good solution for most people who need to perform some simple automated tasks for deleting files on their PCs. If you have any questions, feel free to post a comment. Enjoy!
希望这是一个很好的解决方案,为大多数人谁需要执行一些简单的自动化任务删除文件在他们的电脑上。如果你有任何问题,请随时发表评论。享受吧!

 English
 中文
中文 


