 English
 中文
中文 磁盘上分区的容量通常不会在一开始就被合理分配,因此在许多情况下有必要在Windows 10中调整分区大小。例如,一段时间后,你可能会发现某些分区(例如分区C)已满,并继续收到警告“ 磁盘空间不足 ”。再比如,盘开始是有一个分区:分区C,为了方便地管理文件和数据,需要在磁盘上创建更多分区。
在上述情况1下,你需要改变分区大小实现增大C分区。在第二种情况下,你可以缩小分区,得到未分配的空间后,然后在未分配空间之上创建新分区。简而言之,在磁盘使用期间使用靠谱的方式调整分区大小是非常重要的。
如何在Windows 10中扩展或缩小分区大小?
我们知道了在Windows中调整分区大小的必要性,现在就来了解下如何在Windows 10中简单有效地调整分区大小了。这里介绍两个软件,可以帮助你调整分区大小:Windows内置磁盘管理器工具和第三方免费分区工具傲梅分区助手专业版。
✍ 建议: 如何在两个工具中选择:
► 如果磁盘上有连续的未分配空间在你想要扩展的两个分区之间, 可以使用磁盘管理器。
► 如果磁盘上没有连续的非分配空间在两个分区中间,则可以使用傲梅分区助手专业版。
或者想要突破磁盘管理器缩小分区限制,实现无极缩小分区的大小, 可以选择傲梅分区助手专业版。
在没有第三方软件的情况下实现Windows调整分区大小
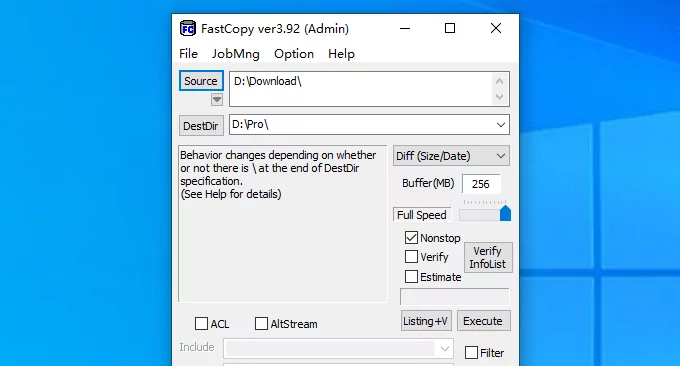
首先,按Windows + R,输入diskmgmt.msc并按Enter来访问“磁盘管理”界面。

1.右键单击要扩展的分区(这里是系统分区:C分区),然后选择扩展卷。

2.您将进入“ 扩展卷向导”界面,单击“ 下一步”。
3.指定要添加到C分区的可用空间,然后单击“ 下一步”。
4.单击完成,然后等待几秒钟以完成操作。
注意:
- 如果分区后面没有相邻的未分配空间,则选项扩展卷将变为灰色。
- 要在打算扩展的分区后面获得空闲空间,可以删除其后面的相邻的分区以获得未分配空间。但是,这将导致数据丢失。
通过磁盘管理缩小Windows 10中的分区
1. 右键单击要缩小的分区,选择“压缩卷”。

2. 在t窗口中键入的空间量在MB收缩,然后单击“压缩”。

3. 分区缩小后,您会发现分区后有一个新的未分配空间。您可以使用未分配的空间创建新分区。
那么,如何轻松,成功地克隆磁盘?由于Windows缺少克隆功能,我们将不得不使用专业的第三方磁盘克隆软件,但是哪一个足够可靠,可供我们选择?
使用第三方免费分区软件在Windows 10中调整分区大小
傲梅分区助手专业版是一款免费且功能多的分区管理软件,可以实现灵活快速地更改分区的大小。
移动分区功能,可让您移动分区的位置,使要更改的分区后面出现未分配空间。继而实现不删除相邻分区的情况下实现扩大分区。它也可以缩小分区,并且打破磁盘管理调整大小的限制:即使分区具有可用空间也无法缩小分区的情况
在Windows 10中扩大分区大小,不丢失任何数据
步骤1. 点击下方按钮安装并运行软件。在主界面中,确认您需要移动的分区,右键单击该分区,然后选择“ 调整/移动分区”。

步骤2. 将选定的分区拖到右端末,然后单击“确定”

步骤3. 你可以预览与C分区相邻的未分配的空间。右键单击C分区,然后选择“调整/移动分区”

步骤4. 向右拖动C分区以使用未分配的空间放大它,然后单击“确定”。

步骤5. 自动返回到主页界面。您可以预览C分区将被扩展。单击左上方的“提交”以执行挂起的操作。
打破磁盘管理器无法进一步缩小空间的解决方法
在使用磁盘管理器时你可能会发现,在对分区进行压缩时,明明有30GB的数据可以缩小,但是却只能选择15GB来压缩,磁盘管理器无法压缩如何解决这个问题呢?
步骤1. 启动傲梅分区助手专业版。右键单击需要缩小的分区,然后选择“调整分区”。

步骤2. 向左拖动双向箭头以使其收缩。

步骤3. 单击“应用”执行操作。
总结
傲梅分区助手专业版兼容新版win10,同样也支持WindowsXP、7、8、8.1操作系统,除了基本的分区功能外,同样也有磁盘克隆,系统迁移功能等高级功能免费使用!


